
The iSight camera has a (decent) microphone. (Two, in fact, but the resulting signal in your mac is mono.) To use it as a microphone there are two problems:
1. The iSight picks up a lot of extra/ unwanted sounds.
2. The digital audio signal coming from the iSight is not configurable and doesn’t work with many applications right away.
Here’s how to get around those problems:
1. Reducing unwanted/ ambient sounds
The iSight seems to have a default setting for Automatic Gain Control (AGC). This means that it adapts to the volume of sound around it. When the loudness of the sound that you are recording is low, the iSight gets more sensitive or amplifies it so it sounds louder in the audio signal to the Computer. This means that all kinds of ‘ambient’ sounds are also being picked up. (Besides your voice or the sounds that you actually want to record.)
To avoid this we need to set the iSight’s input gain rather low and move our mouth close to the microphone so we ’re coming through clear (and loud).
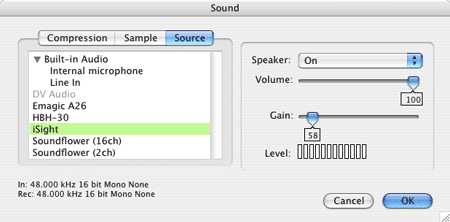
The most direct way to influence the gain settings is through the Quicktime device settings panel. (See picture 1 below.) Unfortunately, This is not part of the System preferences. This preference panel shows up in some applications that use an audio input device. Too bad that a lot of recording applications don’t implement this setting panel so you can’t control the iSight’s gain setting directly!
Picture 1: Example audio-in settings panel implemented in Recorder.xhead:
A workaround is to find an application that does offer the input setting panel, use it to adjust the settings and then switch over to the application you wanted to use with the iSight in the first place and hope it takes over the settings. An example of an application that implements the settings window is Recorder.xhead from www.xheadsoftware.com
2. Getting the signal in
The iSight produces a digital audio signal with specific (fixed) properties only: 48 kHz sample frequency, 16 bits, mono. Since a lot of recording programs like Garageband don’t accept 48 kHz signals as input you can’t use the iSight directly.
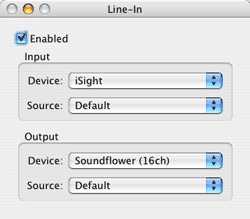
The trick is to use an application that will take the iSight input and route it to another device or application. One such application is Rogue Amoeba’s free LineIn utility.
Picture 2: The LineIn utility:
Example setup
Here’s what I got working:
1. Open the recorder.xhead application.
2. Click the ‘…’ button to open the recording settings.
3. Select the iSight as input under the ‘Source’ tab. See Picture 1 above.
4. Adjust the gain to something very low, like 55. (You may want to test this by selecting ‘speaker: on’.)
5. Open the application LineIn.
6. Select the input device to iSight.
7. Switch back to recorder.xhead.
8. Quit recorder.xhead.
9. LineIn should now be the frontmost application. Check the ‘Enabled’ checkbox.
If all goes well, you should now be getting the iSight signal with proper gain setting into the device you selected as output device in LineIn.
Watch out!!
- The ‘Gain’ slider (Picture 1) may show the wrong value! Always change it a little and then change it back to your desired setting to be sure that the gain is set to what it indicates. (This is a bug.) For this reason it is wise to set Speaker: to ‘on’ because you will immediately hear when the signal is too loud.
- Follow the exact steps as described above otherwise the settings may not ‘stick’ in LineIn and you will end up with a signal that is way too loud.
- I have tried other combinations of applications but they either don’t work at all, produce way too much latency (delay) or produce a distorted signal. (There may still be other combinations that do work which I haven’t tested yet.)
Good luck and have fun ;-)
PS: I may post an RSS + enclosures (Podcasting) feed with test recordings and spoken explanations in the coming days.
Comments
Author: thatcher
Date: 2007-10-11 03:23:44
Hi Hugo,Where is the microphone(s)?Thanks